Using ARM TTK in DevOps Pipeline
I recently started working towards a future in Infrastructure as Code. This means more focus on ARM Templates and Azure DevOps Pipelines.
There are many posts about how to deploy ARM templates, and there are several posts about using pipelines for deployment. I wanted to write this post about how you can use ARM TTK in your DevOps pipeline to test the ARM templates you want to deploy. This is equally a post for me to learn, as it is to spread awareness on tooling and features.
I will assume that you have a working Azure subscription, an Azure DevOps organization, and the necessary software on your computer. I will also assume you have configured Azure DevOps, and there is a project you can work in. This project needs to have repos, build pipelines and releases enabled. I will not give a detailed account on the pipelines, as this is easily available in other blogs.
- Create service principal with correct permissions
- Create service connection
- Set up repository structure
- Create build pipeline (template testing)
- Create release pipeline (resource deployment)
Azure
Create an Azure resource group for deployments.
PowerShell:
New-AzResourceGroup -Name RG-AzDevOpsTesting -Location 'West Europe'
Az CLI:
az group create --name RG-AzDevOpsTesting --location westeurope
Service Principal
You need some way of connecting to your Azure Subscription from Azure DevOps. This is what a Service Connection is for. To create a service connection, you first need to create an Azure AD Service Principal with sufficient permissions.
Sidenote - You could go with the MS recommended approach, but that creates a service principal with contributor permissions on your entire subscription. I am not a huge fan of this approach, because I like to keep the permissions as restricted as possible. You decide what is best for you, but I always use the manual method, and pre-create the service principal.
I am a fan of all things that can be automated, and therefore also a fan of PowerShell. Please note the important information from MS:
The default role for a password-based authentication service principal is Contributor. This role has full permissions to read and write to an Azure account.
Create a service principal with PowerShell (Sign in to Azure before running this):
$servicePrincipalName = “YourServicePrincipalNameHere” $resourceGroupName = “YourResourceGroupNameHere” $subscriptionName = “YourSubscriptionNameHere”
Write-Host “Changing context to $subscriptionName subscription” Set-AzContext -Subscription “$subscriptionName”
$rg = Get-AzResourceGroup -Name $resourceGroupName
Write-Host “Creating Service Principal $servicePrincipalName…” -NoNewline $sp = New-AzADServicePrincipal -DisplayName $servicePrincipalName ` -Scope $rg.ResourceId -Role “Contributor” Write-Host “done”
$BSTR = [System.Runtime.InteropServices.Marshal]::SecureStringToBSTR($sp.Secret) $UnsecureSecret = [System.Runtime.InteropServices.Marshal]::PtrToStringAuto($BSTR)
Write-Host “Service Principal Created” Write-Host “This is the only time the password will be available in clear text. Document in a safe place before clearing window or terminal log!” Write-Host “Application Id: $($sp.ApplicationId)” Write-Host “Application Password: $UnsecureSecret” Write-Host “Tenant Id: $((Get-AzContext).Tenant.Id)” Write-Host “Subscription Id: $((Get-AzContext).Subscription.Id)”
You can find the powershell script here.
You can also create service principal with az cli, but I am most familiar with PowerShell at the moment. Please use the one you are most comfortable with, but either way you need to take note of the resulting clientsecret (password) and clientid (username).
This will create a service principal in your Azure AD with contributor permissions on the resource group where you want to deploy resources. Failure to provide resource group in the cmdlet for creating service principal will grant the service principal contributor access on the subscription scope (this is the default setting). If you do not want to assign premissions on principal creation, you can use the -skipassignment switch. This switch also exists for az cli.
Service Connection
In Azure DevOps there are several different service connections you can create. These all make a connection to external services, and grants access permissions to these services. I will not be going through any other connections than the ARM connection.
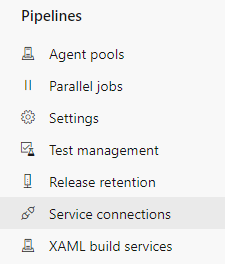
Open Project Settings for your DevOps project, and choose Service Connections.
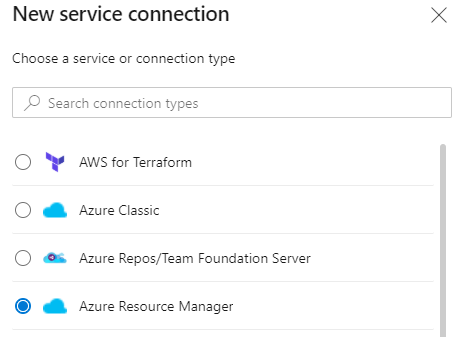
Choose “Create Service Connection”, and the “Azure Resource Manager” connection type.
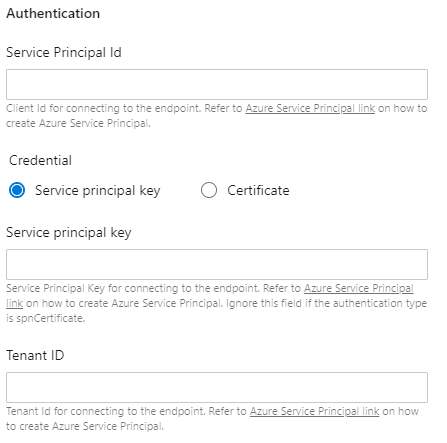
Choose the “Service Principal(Manual)”.

Enter your specific service principal information. Choose “Azure Cloud” for regular Azure use. If you are using anything else, you will most likely know what to choose here.

Enter the subscription ID of where the deployed resource will reside. The service principal needs some access to the required resource groups in this subscription. Most likely you only have one tenant. Somewhat oversimplified: your Azure AD is your tenant, and TenantId can be found under Azure Active Directory blade in Azure portal (requires sign in). To get your subscription Name, Id and TenantId, use the following PowerShell or Az CLI, then copy the relevant name and ids:
Powershell
Get-AzSubscription | Select-Object Name, Id, TenantId | Format-Table -AutoSize
Az CLI:
az account list --output table
You then need to enter the service principal information noted when creating the sp earlier in this post (you did note it, right?). If not, there are ways to reset the password for a service principal. Also enter the TenantId for the relevant subscription. Click verify, and you should have created your service principal!
Give your service connection a descriptive name, so you can find it easily later.
If there are errors, mostly it is because of missing resource access. Make sure your service principal has access to a resource group in the subscription. To test if access is the problem, you can grant the principal temporary contributor access on the subscription. If this does not fix it, keep troubleshooting.
Repository Structure
The structure you create for your repository entirely depends on which use you are planning. In this case we are only doing a simple test, and a single resource creation, so we will keep it simple.
If you have more complex needs, you might need to plan the structure more thoroughly.
- Create a folder called “.pipelines” to store your yaml pipeline files.
- Copy the pipeline from here.
- Create a folder called “.azure” to store your ARM template.
- Copy the template and parameters from here.
- This is a quickstart template for creating a free web app.
- Create a file called readme.md to describe your repository. This is a good place to document the structure in markdown format.
We will be commiting to master branch in this example, but feel free to use a different branching strategy. Some choose to create a dedicated development branch for testing and development, and do a pull request to master when finished. This will be more important if you are many people working against the same repository.
Build pipeline
It is in the build pipeline you will be using Azure Resource Manager Template Toolkit (ARM TTK).
Short explanation on what it is:
The tests will check a template or set of templates for coding best practices. There are some checks for simple syntactical errors but the intent is not to re-implement tests or checks that are provided by the platform (e.g. the /validate api).
There are several different methods for using this toolkit in Azure DevOps - Marketplace extension or manual PowerShell tasks. Both have their own advantages and drawbacks. Because I am comfortable using PowerShell, I have chosen to mainly use this method. It does take some extra time, but I think it makes the process more transparent.
Create a pipeline yaml file.
Some initial settings (sets name, triggers and the agent pool):
name: ARM-TTK-CI
trigger: batch: true branches: include: - ‘master’ paths: include: - ‘.azure’
pool: vmImage: ‘ubuntu-latest’
A couple of tasks for downloading and extracting the toolkit:
steps:
-
task: AzureCLI@2 displayName: ‘Download ARM Template Tester Toolkit’ inputs: azureSubscription: $(serviceConnection) scriptType: ‘pscore’ scriptLocation: ‘inlineScript’ workingDirectory: $(System.DefaultWorkingDirectory) inlineScript: ‘curl https://azurequickstartsservice.blob.core.windows.net/ttk/latest/arm-template-toolkit.zip –output arm-template-toolkit.zip –silent’
-
task: ExtractFiles@1 displayName: ‘Extract ARM Template Tester Toolkit’ inputs: archiveFilePatterns: ‘$(System.DefaultWorkingDirectory)/arm-template-toolkit.zip’ destinationFolder: ‘$(System.DefaultWorkingDirectory)/arm-template-toolkit’ cleanDestinationFolder: true
A task for actually testing the templates in our template folder:
- task: PowerShell@2 displayName: ‘Run deploymentTemplate tests from ARM Template Tester Toolkit’ inputs: targetType: ‘inline’ script: | Import-Module ./arm-ttk.psd1 Test-AzTemplate -TemplatePath ‘$(System.DefaultWorkingDirectory)/.azure’ -Test deploymentTemplate pwsh: true workingDirectory: ‘$(System.DefaultWorkingDirectory)/arm-template-toolkit/arm-ttk’
Then publishing if the testing was successful:
- task: PublishBuildArtifacts@1 displayName: ‘Publish artifacts’ inputs: pathToPublish: $(Build.ArtifactStagingDirectory) artifactName: ‘drop’
You can find the yaml file here.
This file will perform the following steps:
- Download the ARM TTK powershell module.
- Run ARM TTK deploymentTemplate tests on the arm templates.
- Compress and publish the templates as an artifact.
Run your pipeline and confirm that an artifact has actually been dropped. Check the contents of the artifact, and make sure that the templates and parameter files are available in the zip.
It is possible to use the built in task for testing the template with ARM TTK, but I have not been using this yet. Sam Cogan wrote a piece about it earlier this year. He also did a post about the ARM TTK PowerShell module. If I find the time, I will try to update this post with the marketplace extension.
Release pipeline
The release pipeline uses an existing service connection to connect an agent to your Azure Subscription, and deploy the necessary resources. Since the templates already should be validated, this pipeline does not need to run its own testing. It will run a default syntax validation before releasing to Azure.
It is possible to configure the release so that deployment will be run in a Complete Deployment Mode. This makes sure we always know what is running in the relevant resource group, but it will also remove resources in the resource group that was not defined in the template. Use it if you prefer.
Create a new pipeline, start with an empty job:

Add an artifact from your build pipeline (it must have been run at least once, and published an artifact). Choose an agent pool; I use Ubuntu 20.04 most of the time. If windows features are needed, use the latest windows pool.
Add the deployment task:

Configure the task according to your needs. Most settings should be pretty self explanatory. Enter the resource group created earlier as the target resource group.
If you want to use the complete deployment mode, mentioned in a previous paragraph, you need to choose this as incremental is the default.

Be advised that this will remove all resources in the selected resource group, that are not defined in your template! Use with caution as this will delete undefined resources in relevant resource group without requiring confirmation from you!
For testing purposes, incremental will work just fine, and it will not delete undefined resources.
Run the pipeline. Fix errors. Run the pipeline again. You will most likely run into errors. Review the release logs to troubleshoot and fix these errors.
Verify Azure resources
Check that your resources have been created as intended. Check that changes to the ARM templates result in an expected resource change.
It may also be a good idea to test how it runs without changes to template, to see what happens with your resource.
Wrapping up
So this turned into a longer post than intended, and I hope you made it through. If you have suggestions for improvement, please leave a comment below. This is a learning experience for me, and constructive criticism is always welcome.
Remember to delete the resources when they are no longer in use.
All information is given as is, and I do not claim to have all the correct answers. Use included scripts or actions at your own risk, and always double or triple-check scripts/yaml/json downloaded from external sites. You never know what they contain.