Self-Hosted GitHub-Runner
In my last post, I explained a deployment difference between ARM templates and Terraform. Then I suggested a few possible workarounds for the Terraform PaaS networking challenge. One of which was deploying a GitHub-runner in a network you control. This post will outline the steps required for deploying your own self-hosted GitHub-runner.
Scoping
Since I do not have access to a GitHub organization or Enterprise, this post will focus on repository-level runners. I will show you how to use a GitHub-runner in a container on your local machine. Future posts might add examples for Azure Container Instance, Azure VM or Azure Kubernetes Service, but I assume it is similar to this.
Requirements
If you want to follow the steps outlined in this post, you will need:
- A GitHub Account with repository for testing
- Docker Desktop with WSL2 backend
Container Image
There are several different roads to a containerized self-hosted GitHub-runner.
- You can build a custom container image from scratch.
- Choose OS, Install github required software, install github runner binaries, configure for connection to github, and install additional required software.
- You can start with a pre-made image, and customize the image.
- Choose the starting image with github software and runner, configure for connection to github, and install additional required software.
- You can use a pre-made image, and install additional software at job execution if necessary.
I have chosen the last option, simply because this requires the least amount of container image build experience. Which I have way too little of.. Choosing the custom build option can result in a slimmer container image, and will most likely reduce execution time.
Docker Desktop (or similar)
You can find a nice install guide here for Docker Desktop on Windows with WSL2 or Hyper-V backend.
If you are using Ubuntu, you can find a guide that suits you here. More distros are listed in the left side navigation.
Make sure you can reach the internet from containers running on your machine. This is required for downloading container images, and contacting GitHub Workflows for reporting status and fetching jobs.
You also need to be able to run Linux containers, and make sure this is chosen in your docker engine. You can find instructions for Docker Desktop here.
Docker Desktop service, or some other Docker engine, must be running. I use Docker Desktop personally, but mostly because it is easy to use for my test cases. When it is running, you can see an icon in the taskbar.

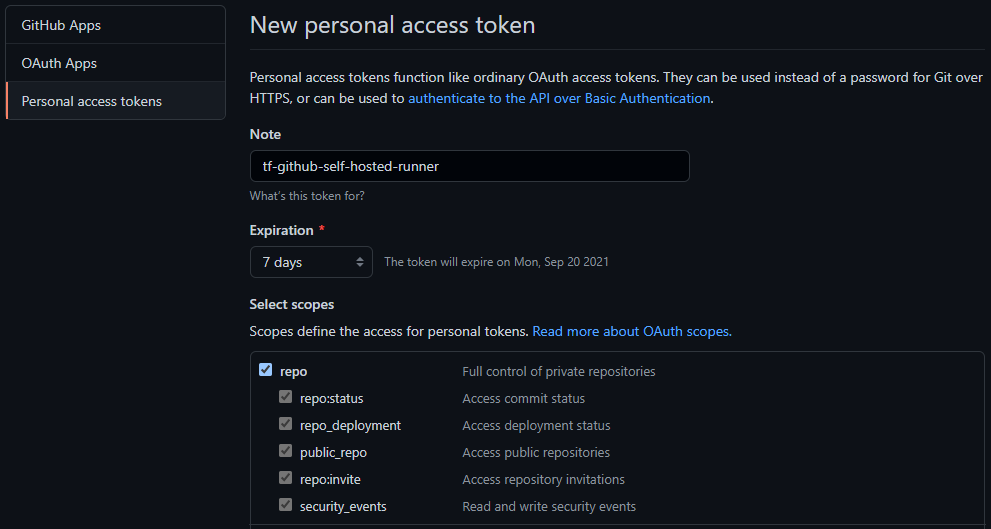
Generate a GitHub Token
You should already have a suitable repository, but if you don’t just create one with a descriptive name (docker-test, test-docker, gh-runner-testing, etc.).
- Navigate to your GitHub personal access tokens page.
- Log in to GitHub if not already done.
- Choose “Generate new token”.
- Confirm your password, if necessary.
- Add some form of note to describe your secret.
- Assign permissions for repo scope.
- Expiration can be set to 7 days for this test.
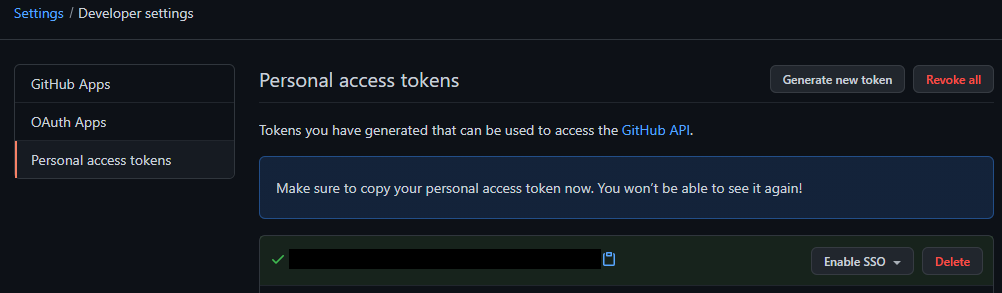
- Generate the token.
Remember to record your token somewhere safe! You will not be able to retrieve the token later.
Make sure you do not check this in to any repository anywhere. Private or public, does not matter. Secrets should never be checked in to any repository, ever. You can always create a new token, or regenerate it if it is lost or compromised.
Docker run command
Starting the docker container is as simple as running a docker command in your shell of choice. Here is the command I will be running for this demo, slightly modified from the source (repo name - tf-dockerpoc):
docker run -d –restart always –name github-runner \ -e REPO_URL=“https://github.com/torivara/tf-dockerpoc" \ -e RUNNER_NAME=“github-runner” \ -e ACCESS_TOKEN=“myGitHubPersonalAccessToken” \ -e RUNNER_WORKDIR="/tmp/github-runner-tf-dockerpoc” \ -v /var/run/docker.sock:/var/run/docker.sock \ -v /tmp/github-runner-tf-dockerpoc:/tmp/github-runner-tf-dockerpoc \ myoung34/github-runner:latest
I will try to describe the different parts of this command below.
- -d: Run a docker image in detached mode.
- --restart always: The container always restarts when it exits.
- --name github-runner: Container name should be github-runner.
- -e XX=YY: Environment variable XX should be set to value YY.
- -v /xx/xx:/yy/yy: Mount directory /xx/xx to /yy/yy in container
- myoung34/github-runner:latest: Pull and run latest version of container image myoung34/github-runner.
If you are running on Windows, the line endings need to be changed according to your shell. Use the backtic ( ` ) for PowerShell. The command above is running in Ubuntu on WSL2 backend, and is therefore using the backslash ( \ ). The WSL2 backend automatically “speaks” to Docker Desktop for running containers. More on this backend here. Also the path mounts might need modification for running on Windows.
This GitHub repository contains relevant information on running the container differently, for instance how other environment variables can be set.
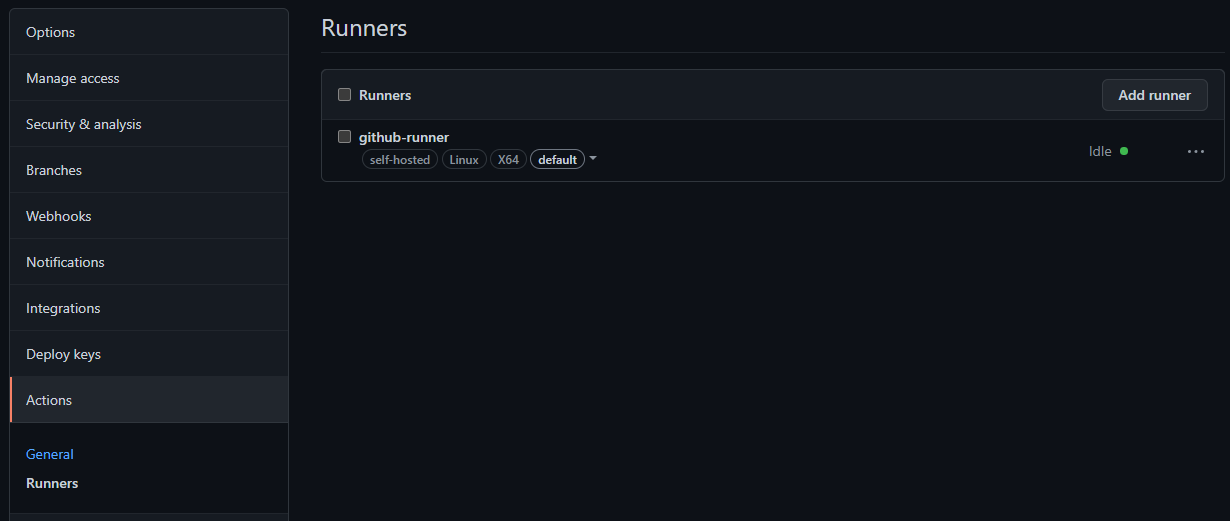
The Result
When the container is started successfully, you can see the runner as “idle” in your GitHub repository Settings -> Actions -> Runners.
Use in a workflow
When you have this runner in an idle state, it is ready to accept jobs. There are several different ways to use this in your workflow, but this is the easiest if you have only one self-hosted runner:
name: Package
on: release: types: [created]
jobs: build: runs-on: self-hosted steps: - uses: actions/checkout@v1 - name: build packages run: make all
Note the runs-on: self-hosted property. More info on usage here.
Use actions as you would on a GitHub hosted runner.
Summary
You should now be able to run your own Self-Hosted GitHub-runner, and make sure your public IP is added to the PaaS firewall exceptions. Of course, this is not ideal for a production scenario, but it is a nice proof of concept. The runner will stop running when your machine shuts down.
A better solution would be to host it in Azure VMs (e.g. Azure VM or Azure VM Scale Set), cloud container service (e.g. ACI or GCR), or cloud K8s service (e.g. AKS or GKE). I would prefer a managed service, to reduce administrative effort. This would make scaling and high availability easier to accomplish.
In my next blog post I will go a step further and actually provision Azure resources with Terraform from this runner. Most likely an Azure Key Vault and an Azure Storage Account, both with network restrictions enabled.
As always, don’t hesitate to comment if you see room for improvement!